Tempering Guide
Last Updated:October 13, 2024|Change Log
The Tempering system enables players to customize their characters by adding powerful, build-defining affixes to their equipment. Legendary equipment can be given two Tempering Affixes, but Unique items cannot be Tempered. By using Tempering Manuals that are found randomly throughout the world of Diablo 4, players can learn Tempering Recipes that can be used unlimited times.
After selecting a piece of equipment, selecting the Tempering Recipe, and supplying the materials to a Blacksmith, a random Tempering Affix from the selected Tempering Recipe is rolled on the equipment. Players can reroll these Affixes up to 5 times if they are unhappy with the results. As of Season 5, you can now re-roll an item an additional time for each Greater Affix (GA) on an item. So an item with two GA affixes on it can be re-rolled 7 times.
Tempering Manuals
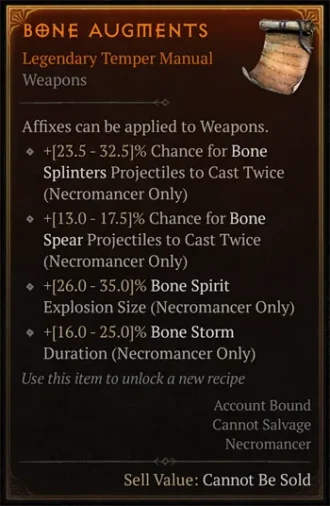
The Tempering system makes use of new items called Tempering Manuals. Use a manual to permanently learn its Tempering Recipe. There is no limit to how many times players can reuse a recipe once they've learned it. Each Manual teaches a Recipe that contains between 2 to 6 different Tempering Affixes.
Tempering Manuals can drop from most content in-game. Players may be more likely to find these Manuals by completing events and defeating monsters in Helltides, defeating world bosses, completing dungeons, Nightmare Dungeons, the Pit of Artificers, and other significant activities. Here's where they can be found:
- Magic quality Temper Manuals in Standard Difficulties.
- Rare quality Temper Manuals in Torment Difficulties.
- Legendary quality Temper Manuals in Torment Difficulties.
In addition, the level 50 priority quest “Tempering” is guaranteed to award a specific Manual. Players get this quest automatically at level 50, and it is completed at the Blacksmith in Kyovashad. The Tempering Manual is contained in a treasure chest at the Blacksmith’s shop.
As of Season 6, Tempering Manuals are class-bound (e.g., only Rogues will find Rogue Temper Manuals) when being discovered, and Tempering your equipment with another class' Tempering Manual will cause the item to become class-bound. You can no longer temper your equipment with, say, Ultimate Cooldown Reduction from Necromancer and use it on a Rogue.
Tempering Categories
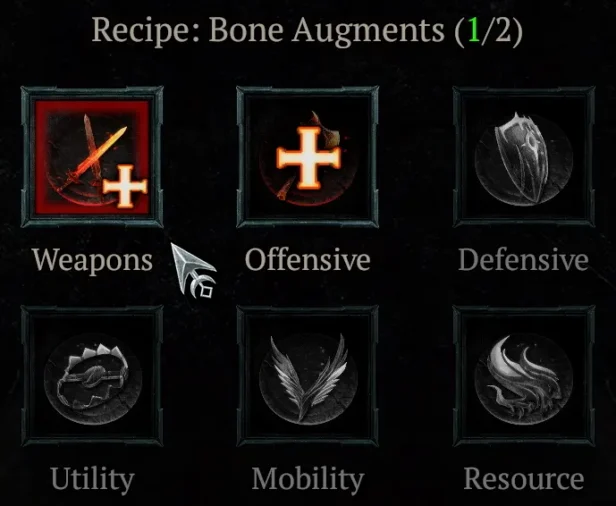
The Tempering Manuals and Tempering Recipes are categorized similarly to Legendary Aspects in the Codex of Power (eg: Resource, Mobility, etc). Each of the six categories corresponds to a subset of item types:
- Weapons: Can only be applied to Weapons.
- Offensive: Can be applied to Amulets, Weapons, Rings and Gloves.
- Defensive: Can be applied to Amulets, Helms, Chest armor and Pants.
- Utility: Can be applied to Amulets, Boots, Gloves, Helms, Chest armor and Pants.
- Mobility: Can be applied to Amulets and Boots.
- Resource: Can be applied to Amulets and Rings.
Ancestral items can have two Tempering Affixes. However, each Tempering Affix added to Ancestral equipment must belong to a different category. For example, an Ancestral Rare or Legendary Helm can have two Tempering Affixes, but one must be a Defensive Tempering Affix and the other must be a Utility Tempering Affix. Rearranging the above list, we can see the full list of compatible Recipe categories for each equipment type:
- Helms: Defensive and Utility
- Chest: Defensive and Utility
- Gloves: Offensive and Utility
- Pants: Defensive and Utility
- Boots: Mobility and Utility
- Amulets: Defensive, Utility, Offensive, Mobility and Resource
- Rings: Offensive and Resource
- Weapons: Offensive and Weapon
Tempering Cost
The cost is based on the Item Power of the selected equipment. The more powerful the item, the more materials it requires. For example, tempering an Ancestral Legendary piece of equipment has the following cost:
- 40 x Iron Chunks or Rawhides
- 15 x Veiled Crystals
- 2 x Baleful Fragments or Coiling Wards or Abstruse Sigils (depending on the item being Armor, Jewelry, or a Weapon/Off-hand
- 1 x Forgotten Soul
Temper Rerolls
When performing Tempering, a single Tempering Affix is picked randomly from the selected Recipe. If a player wants one specific Affix from a recipe, there is a high probability that it won't be picked randomly on the first try. Players can reroll Tempering Affixes multiple times, up to the item’s Temper Reroll limit, a maximum of 5 times.
Tempering doesn't allow you to keep the previous result so you should never try to get a better roll on good affix unless you're comfortable with bricking the item. As of Season 5, you can now re-roll an item an additional time for each Greater Affix (GA) on an item. So an item with two GA affixes on it can be re-rolled 7 times.
There’s a significant chance that players won't be able to get the exact affixes that players want with the limit of 5 rerolls. For example, if a player wants one affix from a recipe with 3 affixes, and another affix from a recipe with 2 affixes, there is a 33% chance they get lucky with the first recipe, a 50% chance they get lucky with the second recipe, and a 16.67% chance they get lucky with both recipes on their first try. Most likely, one or both affixes won't be the affix they wanted. They have a total of 5 additional tries to reroll the affixes to get the ones they want. There is approximately an 84% chance to obtain both the affixes they want using 5 or fewer rerolls. This estimate is accurate for a player who wants one affix from a recipe with 3 affixes, and another affix from a recipe with 2 affixes.
Most optimal combinations of affixes come from recipes with 3, 4, or 5 affixes. Players would be wise to anticipate that they won't get exactly the affixes they want, especially if the recipes contain a large number of affixes. An otherwise perfect item can be "bricked" by the process of rerolling Tempering Affixes if the player has bad luck. For example, if a player wants one affix from a recipe with 4 affixes, and another affix from a recipe with 5 affixes, there is only a 49% chance of getting both acceptable affixes using 5 or fewer rerolls.
For that reason, it is advisable for players to pick at least 1 recipe that has a very low number of affixes, or multiple acceptable affixes. For example, if a player would be happy with either of two affixes from a recipe with 2 affixes, and 2 other affixes from a recipe with 3 possible affixes, there is a 99.9% chance of being satisfied with the results after using 5 or fewer rerolls.
As of Season 6, we can now obtain Scroll of Restoration which resets the tempering charges on your item. This rare item can be found inside of the Dark Citadel.
Summary
- The Tempering system enables players to customize their characters by adding powerful, build-defining affixes to their equipment.
- Players learn Tempering Recipes from Tempering Manuals found randomly throughout their journeys.
- Normal and Sacred items can have 1 Tempering Affix added to them, Ancestral equipment can have two Tempering Affixes, and Unique items cannot be Tempered.
- The Tempering menu can be accessed at a Blacksmith.
- After selecting an item and a recipe and supplying the materials, a random Tempering Affix is picked from the selected Tempering Recipe and added to the selected equipment.
- Players can reroll Tempering Affixes up to 5 times if they are unhappy with the results, with an additional re-roll allowed per each Greater Affix on the item.
Check out our Masterworking Guide to learn all the details about how to continue upgrading your equipment after it is fully-tempered.
Credits
Written by Avarilyn