L1-50 Leveling Guide
Last Updated:October 13, 2024|Change Log
Welcome to the Throne and Liberty Leveling Guide. Leveling in Throne and Liberty is quite simple, the Developers made it easy on the player. Focus on the Main Story Quest, or MSQ for short, to gain the fastest EXP. Contracts and Gathering grant additional EXP however, it isn't nearly as fast as if you were to focus on the MSQ.
There are times where you cannot progress with the MSQ due to being too low level. When this happens, complete some of the Exploration Codex Quests to gain EXP and reach the next levels. AS SOON AS YOU UNLOCK THE NEXT MAIN STORY QUEST, STOP THE EXPLORATION CODEX QUESTS AND CONTINUE THE MSQ! Following this Leveling Guide will walk you through which Exploration Quests to do in order to lower the time spent leveling.
Leveling Milestones
The Prelude is just a "Tutorial" of sorts, introducing you to core mechanics of the game such as various combat mechanics, how to morph, and how to use the grappling system in the game. Once you get through the Prelude, you find yourself on the docks in Kastleton.
Towards the end of Chapter 1 there is a quest called "Janice's Advice" during which you have to investigate a book to find a key. You have to click on specific parts of the object to interact and find they Key. Here is how to interact with the book correctly.

Once you reach Chapter 2 you gain some additional quests with "Appendix" in the name. As you level to 50, complete most of the "Appendix" quests whenever possible, they grant additional EXP.
Before entering the Ship in Chapter 2, interact with this bottle for some free additional EXP.
Click to Enlarge!
"Appendix: The Hero of the Wolf Hunting Contest" can be done during the last 5 minutes of the Event so don't bother spending the entire 20 minutes doing the Event.
Early on in Chapter 3, the quests take you to Urstella Fields. Before going, make sure to craft all the Green Items possible. You should have enough to craft 2 Green Weapons, 4 Green Armors, and at least 2 Green Accessories. If you don't have enough materials to craft all of your Armors, it's okay. By the end of Chapter 4 you'll be able to finish crafting the rest of your gear.
The first few quests have you select 4 Resistance Contracts to complete. Try to prioritize Quality Lithograph: Accessories if possible. This helps later on as most players want to complete Rustic Mother Nature Rings. Lethal Fortune Ring is considered one of the best Blue Rings for many DPS users.
When prompted to purchase items with Contract Coins, don't finish the Appendix Quest until you're level 20 if you don't already have 4 Quality Lithograph: Accessories. If you have these, then purchase Mystic Keys and complete Mystic Globes as you come across them in the open world for additional EXP and progression materials.
Check out our in-depth guide on Mystic Globes and Portals!
During this questline, you'll have to dance with the Goblins. Use the skill that has the same color as the circle around the goblin.
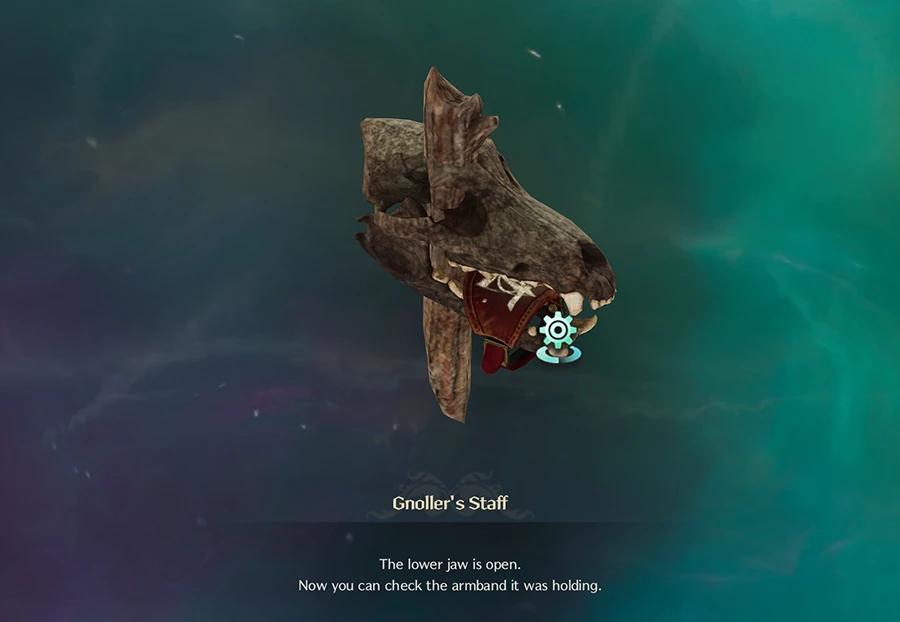
This quest has you investigate the Gnoller's Staff, here are the places on the staff to click on to continue.
After examining the painting, this Appendix Quest introduces you to Taedel's Tower. This is similar to "Solo Boss Rushes" in other games. Each floor is locked behind certain levels and grant EXP + Progression Materials. Do the first floor for the quest, later floors will be completed as you need EXP.
Before heading to Vienta Village, if the Chief Terror Bird in Nesting Grounds is up, kill it as it'll grant some free EXP.
For more information on each Floor's Bosses and Mechanics, check out our Taedel's Tower Guide!
Before leaving Vienta Village finish crafting the rest of your Green Gear.
None of these rings are worth using for anybody because they don't give any special stats compared to the Traits you can get on your Green Rings.
In order to continue the Main Story Quest, you need to be Level 23. This is the first EXP Bottleneck you'll experience in the leveling phase. Do the 2nd floor of Taedel's Tower and then, complete some Explorations Codex Quests in Monolith Wastelands. Don't waste time on Treasure of Daybreak because it needs to be done at a specific time of day.
Most of Chapter 5 is pretty straight forward and shouldn't need much guidance however, "A Sacred Pledge of Blood" does have a timed component in the quest. Below is a video guide on completing this section of the MSQ.
Finishing Chapter 5 including its Appendixes, leaves you around level 26 if you didn't fully complete the Monolith Wastelands Exploration Codex Quests. Head to Abandoned Stonemason Town and start on Won! Golem's Manastone Exploration Codex.
**IMPORTANT!!**
Talk to the Golem Crafter first BEFORE you do the next parts of this Exploration Codex as it'll save you some time. Afterwards, go ahead and continue with Abandoned Stonemason Town Exploration Quests.
Recommended Exploration Quests
- Won! Golem Manastone
- A Powerless Little Friend
- Skip the one that requires you to acquire Vitality Masses because the drop rate is too low.
- Intimidating Breath
Won! Golem's Manastone
When completing this quest, you'll have to bid on specific items based on the keywords the auctioneer says. If at any time it mentions a sword, ignore and don't bid!
- First item, bid when the NPC mentions the ability to "bring dead golems back to life".
- Second item, bid when the NPC mentions "Mana" or "you can craft a weapon..." the Korean translation isn't fully accurate so look for any of these two.
- This second item can only be purchased at night. Complete other quests and just come back when it becomes night.
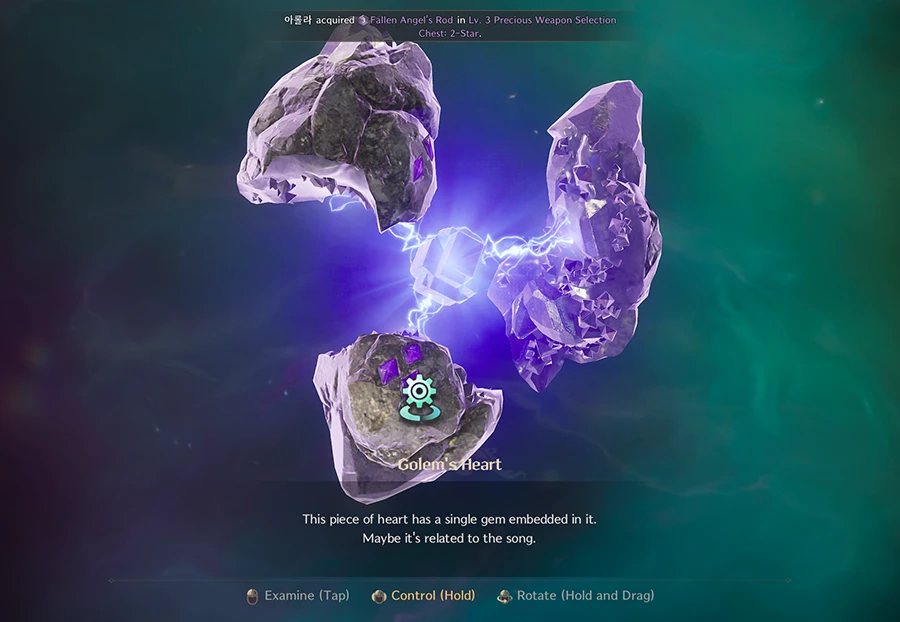
Chapter 6 doesn't require much guidance to complete quickly. However, once you get to the quest "Restoring the Heart" in Chapter 6, rotate the item to find the purple diamonds. Click on the areas with the purple diamonds starting with the section that has 3 diamonds.
After completing Chapter 6 you get to choose a reward. Check your Weapon Combination's Leveling or Build Guides to see which reward, if any, can be used in future builds.
Click to Enlarge!
After completing Chapter 6, you should be Level 30/31. Do Explorations Quests in Moonlight Desert and then Sandworm Lair to reach 32 and continue the Main Story Quest.
Recommended Moonlight Desert Exploration Quests
- Queen's Blessing
- ONLY Gather 2 Star Trees!
- If you happen to be in the area as it's transitioning between daytime and nighttime feel free to do the first part.
- Sands that Make Money
- This second item can only be purchased at night. Complete other quests and just come back when it becomes night.
- Beyond the Sandstorm
- Pretty straight forward, use the sand tornadoes to make it across the area.
- Secret in the Sand Dust
- Towards the end of this quest, you'll have to follow the doll and choose the correct hole the doll didn't go in. Below is a video example to help.
Recommended Sandworm Lair Exploration Codex Quests
- Qualification of Being a Guild Owner
- The Voice Behind the Mask
- Don't waste time following all the Guiding Lights, just head north of Queen's Trap and enter the Unknown Rift. Below is a video showing what the entrance looks like and how to complete the quest.
- Stronger Sandworm
- You don't need to do the 25 ant kill quest.
After finishing these, you should be Level 32. If not, go back and finish any Taedel's Tower Bosses you haven't yet completed.
Make sure to go back and finish any of the additional Exploration Quests that required Day/Night times to complete.
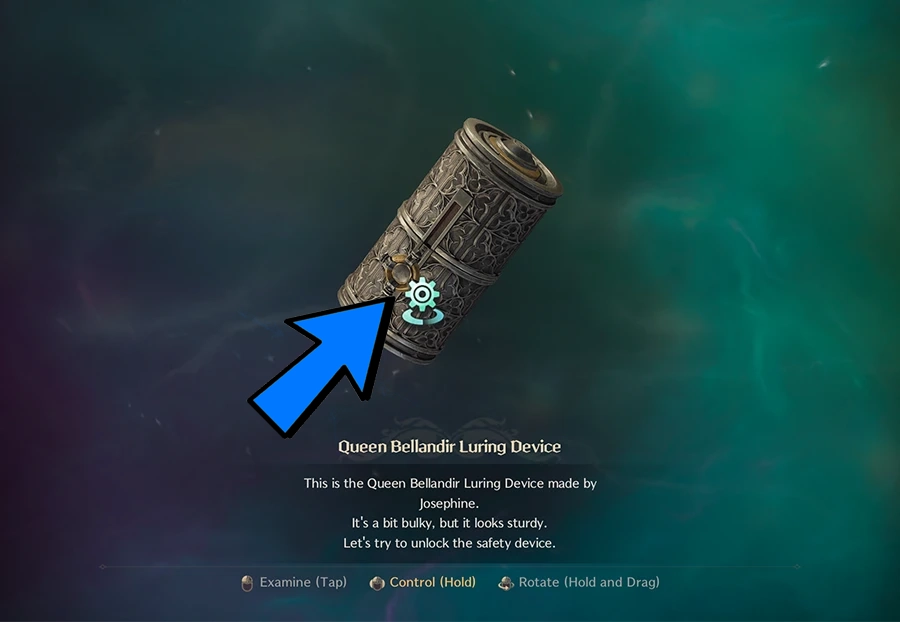
During the quest "Queen Bellandir Luring Device", examine the device and click on the item in this order.
When it comes to rewards, check your Weapon Combination's Leveling or Build Guides to see which reward, if any, can be used in future builds.
First, clear Taedel Tower floor 6 if it's easy for you, if not save for later. Afterwards head to Daybreak Shore which is south of Sanctuary Oasis and complete its Exploration Quests. Daybreak Shore's quests have some that can only be finished at night, if you're unable to reach Level 38 because of this just head to The Raging Wilds and start on quests there to reach Level 38.
Daybreak Shore's quests are simple, however "Danger Within Peace" requires you to find the page "Collection: To Pirate King Adelico". The page is on the backside of a little hill near the water.
Congrats you're almost done! Complete Chapter 8 alongside finishing Exploration Quests in The Raging Wilds. Chapter 8 requires you to kill a couple bosses but don't worry they're very simple. Just in case you run into issues, I've got you covered!
You can come back to The Raging Wilds after finishing Chapter 8 and finish the Exploration Quests, or just knock them out while you're in the area if the mobs are easy enough for you...completely up to you.
When Havres becomes immune to damage, a heart will break out the casing and go towards him. Stand next to the heart as he does a lightning attack, and the heart will be destroyed allowing you to continue dealing damage to him. Below is a video to help.
Risieth has a couple mechanics to watch out for.
- Whenever Riseth spawns her clones, the real one has any debuffs you've put on her prior like DoTs.
- You can use the puddles to put out the burning stacks she does when she explodes.
When it comes to rewards, check your Weapon Combination's Leveling or Build Guides to see which reward, if any, can be used in future builds.
This is your final EXP Bottleneck! After reaching Level 45 it's smooth sailing from there with just the MSQ. Starting at Level 43, head to Manawastes and complete all of the Exploration Codex Quests possible to do there. After that, reaching Level 45 is just a matter of doing 1-2 Exploration Quests in Akidu Valley!
Finish all Exploration Quests that are available. If any are locked behind Milestones it's okay, there's still enough EXP to be gained. Below are pictures to where a Collection Page can be found for one of the quests. Click on the images to enlarge them!
True to its name, this quest has a few different tests for you to solve. Below is a "Cheat Sheet" of sorts to help you complete these tests. Click on the images to enlarge them.
- Rotate the statues to create this shadowy image.
- Interact with the musical statues in the order of the numbers above each.
- Adjust the platform height by interacting with the pylons. Follow the order shown with the numbers above each pylon.

Finally, your leveling experience is coming to an end. "Finding the Infiltration Route" grants a big chunk of EXP so do that first! Below is a video showing how to do it. Afterwards, continue doing complete the Exploration Quest "Stop the Dark Ritual". If you see other players hitting an elite, join in as that'll grant you about 70k EXP.
If you completed the additional Appedix Quests to do the other low level Co-Op Dungeons and opened the chests at the end of the dungeons, you may not need to complete "Stop The Dark Ritual" to reach level 45.
Focus on the Main Story Quest from here on out and you'll be Level 50 soon!
To investigate the Relic, rotate and connect the lines starting from the top to bottom. Below is a video showing how to do it.
When it comes to rewards, check your Weapon Combination's Leveling or Build Guides to see which reward, if any, can be used in future builds.
Finally, it's over. In order to avoid the gaze, stick to the shadows and stay clear from mobs. Below is a video that shows the path to take without fail.
Most players opt to go for Precious Lithograph: Special Resistance Tactical Armor because it gives Max Health and Melee Evasion however, checking our Build Guides to see if any of the rewards can be used for a future build is a good way to decide.
Summary
- Stick to the MSQ as that grants the highest amount of EXP compared to Gathering and Resistance Contracts.
- Opening the chests at the end of sub-50 Party Dungeon, gives you just enough exp to reach Level 45 with only 1 Exploration Codex Quest in Akidu Valley.
- Open Mystic Portals as you are leveling for additional EXP and progression materials.
- In Chapter 3, before leaving Kastleton you should have 2 Green Weapons, 3-4 Green Armors, and at least 2 Green Accessories.
- After Chapter 4, you can craft a full set of Green Gear that is enough to complete all of the MSQ.
- Check with your Weapon's Build Guides to see if any of the Chapter Rewards can be used in future builds.
Credits
Written by Bloo
Reviewed by Yaen